Sunday 30 March 2014

Spring Turquoise and Blue Eye Makeup

Here comes another look inspired by Spring! It's been a while since I've done a sea/water inspired look so I thought I would give it a go. I just love the combination or the Chartreuse green with turquoise and blue, so pretty! The eyeliner turned out a bit wonky (my Elf liner ran out :( I had to change liner midway), but I still really enjoy this look!


Products used :

Base
  • UDPP
  • NYX Jumbo Eye Pencil in Milk

Eyeshadow & Brows
  • BH 120 Palette (1st Edition)
  • Inglot Shadows in chartreuse green and turquoise (don't have the names, sorry)
  • Urban Decay Naked 2 Palette (Highlight)
  • Maybelline Define-a-Brow in Dark Blonde

Liner & Lashes
  • Ardell 120 Demi Lashes
  • Cover Girl Clump Crusher Mascara
  • Rimmel Eye Khol in Nude
  • E.l.f. Liquid Liner in Black

---

Don't forget to follow me and like my Facebook page for more posts like this ♥

Friday 28 March 2014

Spring Pastel Rainbow Eye Makeup

While Spring is now quite here yet for us in Quebec (it's -11 degrees celcius as I'm writing this), the days have been becoming longer lately, which is a clear sign that warmer weather is in the making. In the Spring time, I always go back to my pastels and colorful shades. Thinking of warm weather inspired me to do a rainbow pastel eye look for you all! Hope you enjoy!


Products used :

Base
  • UDPP
  • NYX Jumbo Eye Pencil in Milk

Eyeshadow & Brows
  • BH 120 Palette (1st Edition)
  • Urban Decay Naked 2 Palette (Highlight)
  • Milani Brow Fix in Light

Liner & Lashes
  • Ardell Demi Wispies Lashes
  • Cover Girl Clump Crusher Mascara
  • NYX Jumbo Eye Pencil in Milk
  • E.l.f. Liquid Liner in Black
---

Don't forget to follow me and like my Facebook page for more posts like this ♥


Wednesday 26 March 2014

Navy Blue Eye with a Pop of Burgundy

I've been feeling like doing a navy smokey eye for a bit now. I did one way back in the day and I had really loved the results. I thought it would be nice to do it again now that I have a better set up. I didn't want to recreate my old look exactly, so I decided to put a twist on it and add a pop of burgundy to the center of the lid. I'm really quite happy with how it looks and I think it would be perfect for a night out!


Products used :

Base
  • UDPP
  • NYX Jumbo Eye Pencil in Black Bean

Eyeshadow & Brows
  • Urban Decay Naked 2 Palette (Brow bone and crease colors)
  • Barbie Loves Stila Palette (Navy Blue and Black)
  • Darling Girl Cosmetics Loose Shadow in London Calling
  • Maybelline Define-a-Brow in Dark Blonde

Liner & Lashes
  • Ardell 120 Demi Wispies
  • Cover Girl Clump Crusher Mascara
  • Milani Liquif'eye Eyeliner Pencil - Black
  • E.l.f. Liquid Liner in Black
---

That's it for this look, hope you all enjoyed it! Let me know in the comments what posts you would like to see next! 

Don't forget to follow me and like my Facebook page for more posts like this ♥

Monday 24 March 2014

Disney Villains Series : Cheshire Cat Inspired Makeup

Hey all! Today I'm back with another makeup look inspired by a Disney Villain! Today I chose to create a look for the Cheshire cat! I went bright, strippy and bold with this one and although it looks a little circus-ey, I think it's a super fun and playful look, just like the Cheshire cat. I'm really enjoying this series so far, it's a lot of fun to make! I'm also thinking of starting a new Pokemon series soon as well. Let me know which ones you would like to see do!


Products used :

Base
  • UDPP
  • NYX Jumbo Eye Pencil in Milk

Eyeshadow & Brows
  • BH 120 Palette (1st Edition)
  • Maybelline Define-a-Brow in Dark Blonde
  • Darling Girl Cosmetics Loose shadow in Alright Ma
  • Urban Decay Naked 2 Palette

Liner & Lashes
  • Ardell 120 Demi Lashes
  • Cover Girl Clump Crusher Mascara
  • NYX Jumbo Eye Pencil in Milk
  • E.l.f. Liquid Liner in Black
  • L.A.Colors Grafix Eyeliner in Purple
---

Don't forget to follow me and like my Facebook page for more posts like this ♥

Saturday 22 March 2014

Neutral and Matte Graduation Picture Makeup

Hey all! Today I'm sharing the makeup I wore for my graduation photo. The photo agency recommend a matte, neutral but polished look, so that's what I went for of course. I did a barely there eye look, pinky cheeks and a natural lip color. I simply deepened up the crease a little bit, defined my eyebrows, added some half lashes and went for flawless skin. I think it turned out very natural, but put-together. It looks nice with or without flash and could be worn to a number of occasions. Also, it was my first time wearing falsies out of the house and they didn't get unglued or anything so I'm really happy!

With Flash

No flash
Sorry for the weird face I'm making, just couldn't get a good picture that day! ahah :P

Products used :

Face
  • Cover Girl Stay Fabulous 3 in 1 Foundation
  • Mac Pro Longwear Concealer (NC 15)
  • Rimmel Stay Matte Powder
  • Canmake Cream Cheek in 09

Lips
  • Revlon Just Bitten Kissable Lipbalm in Honey

Eyes
  • UDPP
  • Maybelline Define-a-Brow in Dark Blonde
  • The Balm Nude Tude Palette - Sultry (to deepen and warm up the crease)
  • Urban Decay Naked 2 Palette - Tease (Crease), Foxy (Lid and brow bone)
  • L'Oréal Infallible Lacquer Cream Liner in Very Black
  • Ardell 315 Half Lashes
  • Cover Girl Clump Crusher Mascara

---

That's all hope you enjoyed this! Have good day everyone! 

Don't forget to follow me and like my Facebook page for more posts like this ♥

Thursday 20 March 2014

Makeup Vanity Staples that I Never Mention

Hi everyone! So I saw a post like this on Emily Noel's blog recently and I thought "What a great idea, I need to make a post like this for my blog!" So here we are, I'm going to share my vanity staples with you all today :)


- Baby wipes : Great for cleaning up swatches, hands and brushes. Much cheaper than using makeup wipes for that purpose.
- Two holes sharpener by Anabelle : The small hole fit regular size pencils and the bigger whole is perfect for those fat crayon type products (like the Jumbo Pencils by NYX)
- Scotch tape : Great for doing sharp angles
- Cosmetic cotton swabs : one side is pointy the other is flat. Great for cleaning up precisely.
- Makeup brush cleanser : To spot clean between uses
- Tweezers : I use them every time I do a makeup look to groom my brows, but also to apply falsies and rhinstones.
- Duo Clear Lash Glue : Great glue, dries clear and doesn't irritate my eyes

---

That's it for my makeup vanity staples! Hope you all enjoyed this quick post! See you the day after tomorrow :) Don't forget to follow me and like my Facebook page for more posts like this ♥

Tuesday 18 March 2014

Nars Laguna and Orgasm Duo

I've been mentioning lately that I was thinking of buying the Laguna/Orgasm duo for a while now. I finally cracked and got it two weeks ago. Today I decided to share my thoughts and opinions on it!


Packaging : The packaging of NARS products is matte and sleek. It looks great when you first buy it, but it gets wrecked in a matter of days. It's kind of disappointing really. It's a luxury product, it would be nice for it to have a luxurious feel every time you take it out. Too bad.  4/10

Price : 50$

Swatches

Color and Finish

Orgasm : The blush is a nice coral with lots of shimmer. Beautiful with most skin tones. 10/10

Laguna : The bronzer is a matte medium shade with a slight orange tone to it. It's quite flattering even on my very light skin. For some reason I thought this would be darker tough. 9/10


Texture and Application

Orgasm : The blush has a soft texture without breaking apart when you swatch it. It's quite pigmented and easy to blend out.  It transfers easily onto the brush. 9/10

Laguna : The bronzer surprised me a little in terms of texture and application. It's quite a dry and densely packed powder. It seems like very little comes off when you swatch it or put a brush in it. It is also very faint once you apply it. You need to build it up in order to get it to be visible (and I'm very pale). It's not all bad tough, since it allows for a lot of control during application. You can either go very light or make it more prominent. It's also much less likely that you will overdo it (unlike with some very pigmented bronzers). I find that it is slightly difficult to blend out. 6/10

Overall

It's a very nice product, but it has a few flaws in my opinion (the packaging being the biggest one). I love Orgasm, but Laguna seems to be slightly overrated. Maybe I'm not using it properly? I definitely like it, but for the price, I thought it would be incredible. I need to try it out more to see if I can make it work for me a little better.

Orgasm : 9.5/10
Laguna : 7.5/10

---

That's all for today's review! Hope this was helpful. Have a good day!

Don't forget to follow me and like my Facebook page for more posts like this ♥

Monday 17 March 2014

Spring Special Occasion Outfit Inspiration

St-Patty's Day Makeup Look

Hey super quick post tonight. I don't usually do this, but it's St-Patty's day and I wore a pop of green to celebrate today. I really liked the look of it so I thought I would share it really quickly! Hope you enjoy, good night everyone ♥


Don't forget to follow me and like my Facebook page for more posts like this ♥

Sunday 16 March 2014

10 Things I love About Spring


1) Longer days, meaning you can spend an evening out and it's still light outside
2) Eating on terrasses
3) Flowers in Bloom - Lilacs are my favorites ♥

4) Weather getting warmer - No need for heavy coat and boots anymore!

5) The feminine fashion - Pastels, florals and lace are my favorites.

6) Birds chirping in the morning - They all migrate south during the winter so I'm always glad to hear them sing once Spring rolls around and they come back.

7) Being able to enjoy walks outside again - Because who wants to go out when it's -20 outside?

8) Motivation to be healthy again - Winter is just unmotivating both in terms of exercise and diet.

9) No more heating - Meaning it's going to be less dry in the apartment and my electricity bill will be much more acceptable, yay!

10) No more snow :D 

11) BONUS : Roadtrips! - I'm going to be road tripping to Toronto for the weekend very soon. Cannot wait to blast music in the car with all the windows rolled down. It's going to be great ♥

Those are the 10 11 things I love about Spring. What are your favorite things about this season? Let me know in the comments! Also, don't forget to check out my Pinterest Spring board!

---
Don't forget to follow me and like my Facebook page for more posts like this ♥

Friday 14 March 2014

Pampering Night : a Beautifying and Relaxing Evening

 Recently, I've been a bit swamped with work and school. This week is also my graduation picture and I want to look my best for the occasion so I decided to give myself a bit of a home spa night to take some time off and beautify a little! I'm sharing this in case you all would like to try it at home!

Here's how I usually proceed

1) First up is my dental routine. I brush my teeth and apply my Whitestrips. I'v been whitening for the past 2 weeks in preparation for my grad picture. These need to sit for 30 minutes so I do that first.

2) Next, I take care of my hair. First, I will shampoo my hair (I use the kitchen sink for that, anyone else does that?), rinse thoroughly and put my hair up in a towel.

Then, while I wait for my hair to dry a little (I want it to be damp, not wet) I start setting up my computer with shows to watch and make myself a drink (I usually make herbal tea, but tonight I felt like having a beer). 

Once that's ready, I comb my hair with a wide tooth comb and apply a hair mask to the ends of my hair. After that, I put my hair up using a clip.

3) Next I prep my skin. I start by washing my face and then I apply a face mask. Today I'm using a purifying mask and I look a little scary as you can see :P

4) Now, it's time to run the bath. I love adding some bubble bath (or a bath bomb, but I'm all out of that) to make it more festive when I feel like pampering myself.

I also  light up a few candles for ambiance. My current favorite two candles to burn simultaneously are Cranberry Pear Bellini and Sweet Clementine, both by Bath and Body Works.

5) At this point 30 minutes have passed and I remove the Whitestrips.

6) Now it's time for the best part : soaking in the tub with a nice drink and my favorite shows!

I also take that time to wash my body with my Honeysuckle body wash, exfoliate, shave my legs and use a massage bar on my legs, knees and elbows to make them soft and hydrated. After 20 minutes, I also wash off the face mask.

7) After my bath, I go back to the sink and rinse off the hair mask and then I wrap my hair back in a towel.

8) Next is skin care. I apply a face oil, moisturizer and eye cream first. Next I exfoliate my lips and apply lip balm. I also apply body lotion at this point.

9) I take my hair out of the towel and apply my usual hair styling products. This time I used an hair oil by Organix and a blow dry lotion by Got 2b.

10) Last but not least, I take care of my nails. This time I painted my toe nails a bright shade of pink and applied press on fake nails (I did this solely for the sake of my grad picture, I actually find them really uncomfortable and cannot wait to remove them!). I moisturize my cuticles with the Lush cuticle cream and also apply hand cream.

11) To end my relaxing evening, I bring my laptop in my bed and keep watching my shows until I fall asleep!

---

That's all I do when I want to pamper myself a little! Do you guys also do beauty nights like this? Let me know in the comments! ♥

Don't forget to follow me and like my Facebook page for more posts like this ♥

Wednesday 12 March 2014

Disney Villains Series : Hades Inspired Makeup

Hey all! Today I'm continuing the Disney Villains series! This one is inspired by Hades from the movie Hercules. Ever since I saw a picture of him recently, I was really inspired to create a look to go with his colors! This is more of an artistic take on things, I hope you enjoy!


Products used :

Base
  • UDPP
  • NYX Jumbo Eye Pencil in Milk
  • L'Oréal Infallible Lacquer Liner in Black

Eyeshadow & Brows
  • BH 120 Palette (1st Edition)
  • Wet n Wild Blue Had me at Hello Palette 
  • NYX Single Shadow in Kiss in Casablanca (Cut crease)
  • Tarte High Performance Naturals (lower lash line blue)
  • The Balm Nude Tude Palette (Black)
  • L'Oréal Infallible Lacquer Liner in Black (brows)

Liner & Lashes
  • Kiss 05 Lashes
  • Cover Girl Clump Crusher Mascara
  • Urban Decay 24/7 Liner pencils in Perversion, Stone and Sabbath
  • E.l.f. Liquid Liner in Black
  • Ardène Glitter Liner in Blue
---

Disney Series Recap

Princesses : Snow White, Pocahontas, Mulan, Cinderella, Little Mermaid, Jasmine

Don't forget to follow me and like my Facebook page for more posts like this ♥

Monday 10 March 2014

Photo Editing 101 : How I Edit my Makeup Photos

Hey everyone! Today I have a bit of a different post to share with you all. In the last year, I have started familiarizing myself more with photo editing. The reason for that is because I was never completely satisfied with how my makeup pictures turned out. Mostly, it was the lighting that was never right, but as I started knowing more and more about it, I started realizing that some other aspects of my pictures needed a bit of polishing. It took a lot of time, trial and error to get to the point that I am now and it's been a learning experience for me since I taught myself how to do it. Anway, I'm quite pleased with the quality of the pictures that I'm able to produce now so I thought I would share my process in case any of you is interested or trying to get into photo editing.

*Disclaimer* I photoshop my pictures, but I rarely ever touch the makeup itself. I only polish the raw edges, meaning any imperfection or lighting issues. If you're looking for a tutorial on how to photoshop lashes or colors or anything like that, this post won't help you very much, sorry!

First, like I mentionned, I use photoshop CS6 for my photo editing. It's kind of complicated to learn at first, but it's really the best editing tool for me. I'll take you step by step with me while I edit this photo to achieve the after picture that you see below.
1) Cropping the picture
The key to a nice makeup picture is cropping out anything that isn't necessary so to keep the focus on the makeup look. Of course if you're doing a full face makeup look than you won't crop as much as I do.
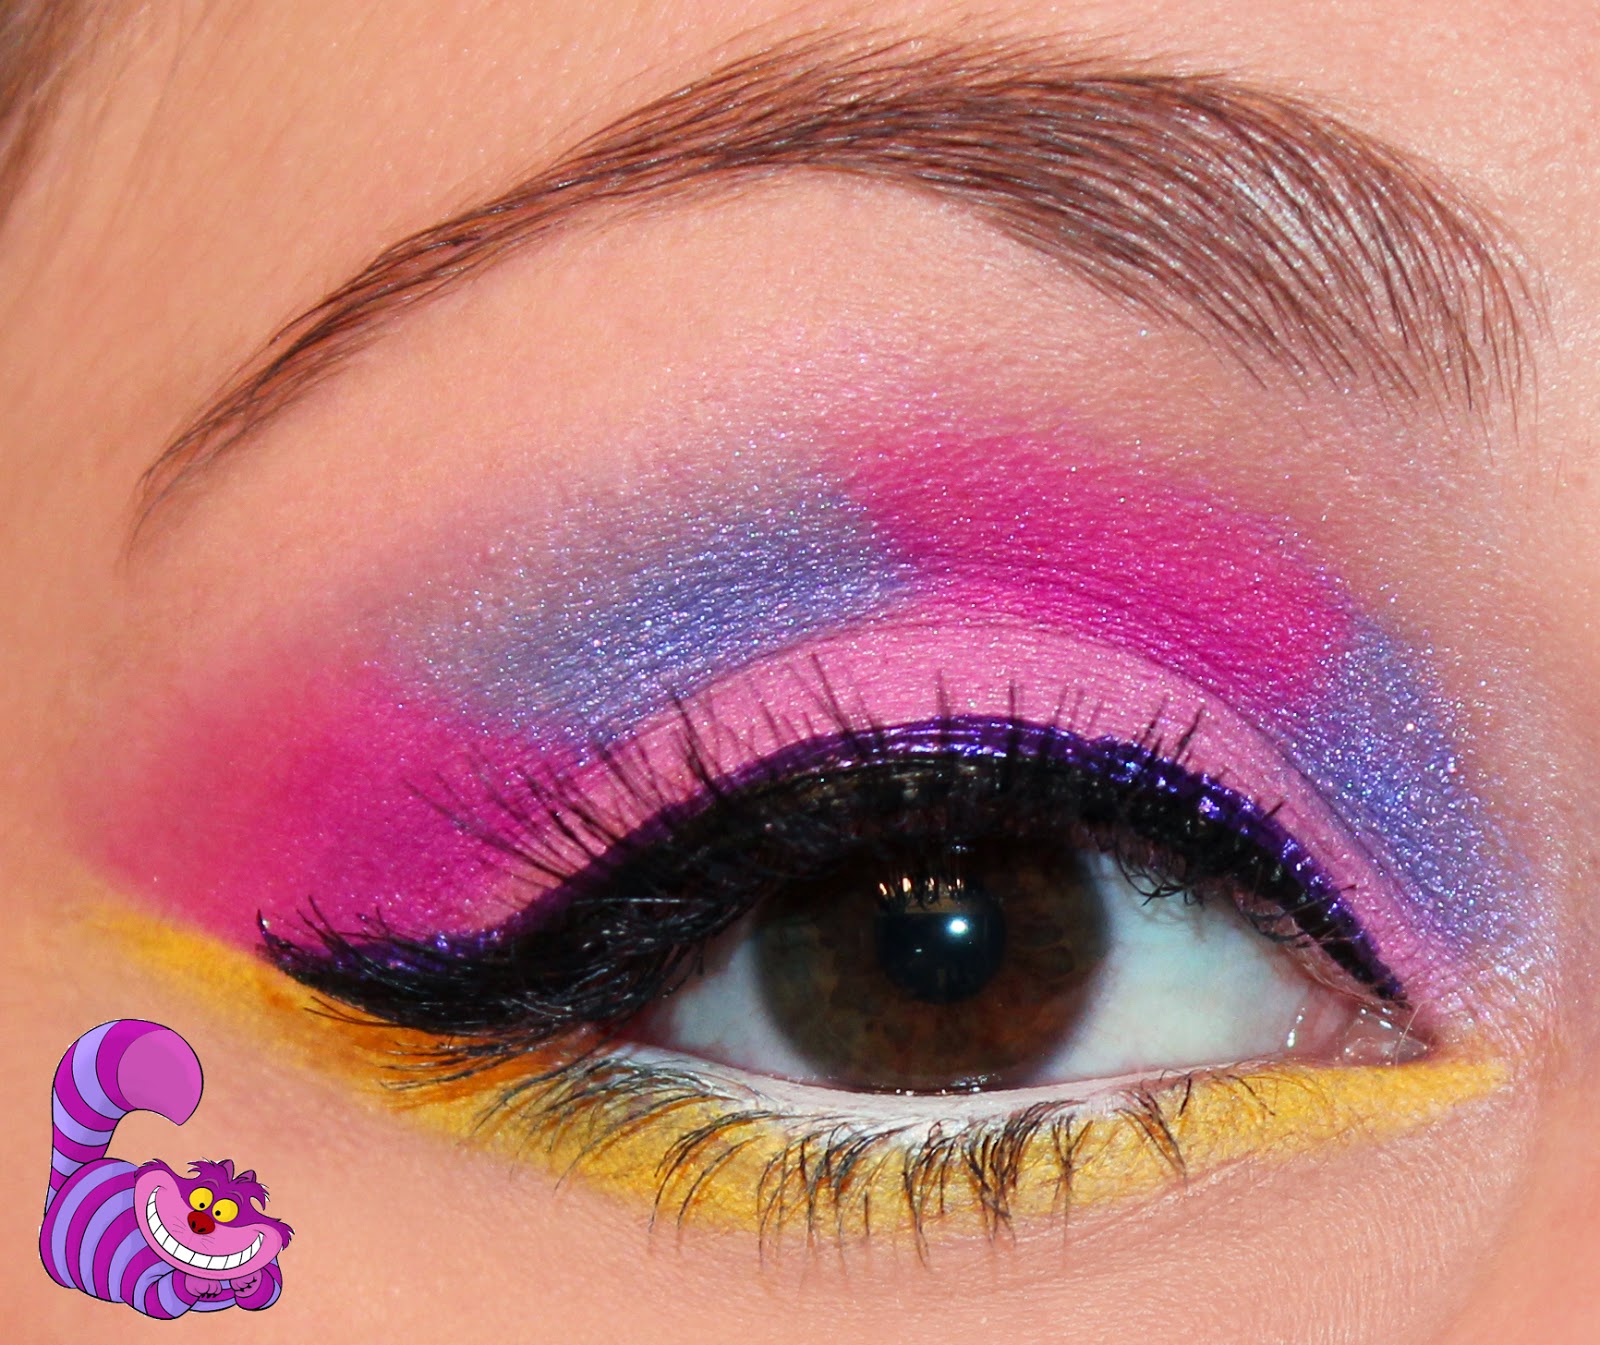
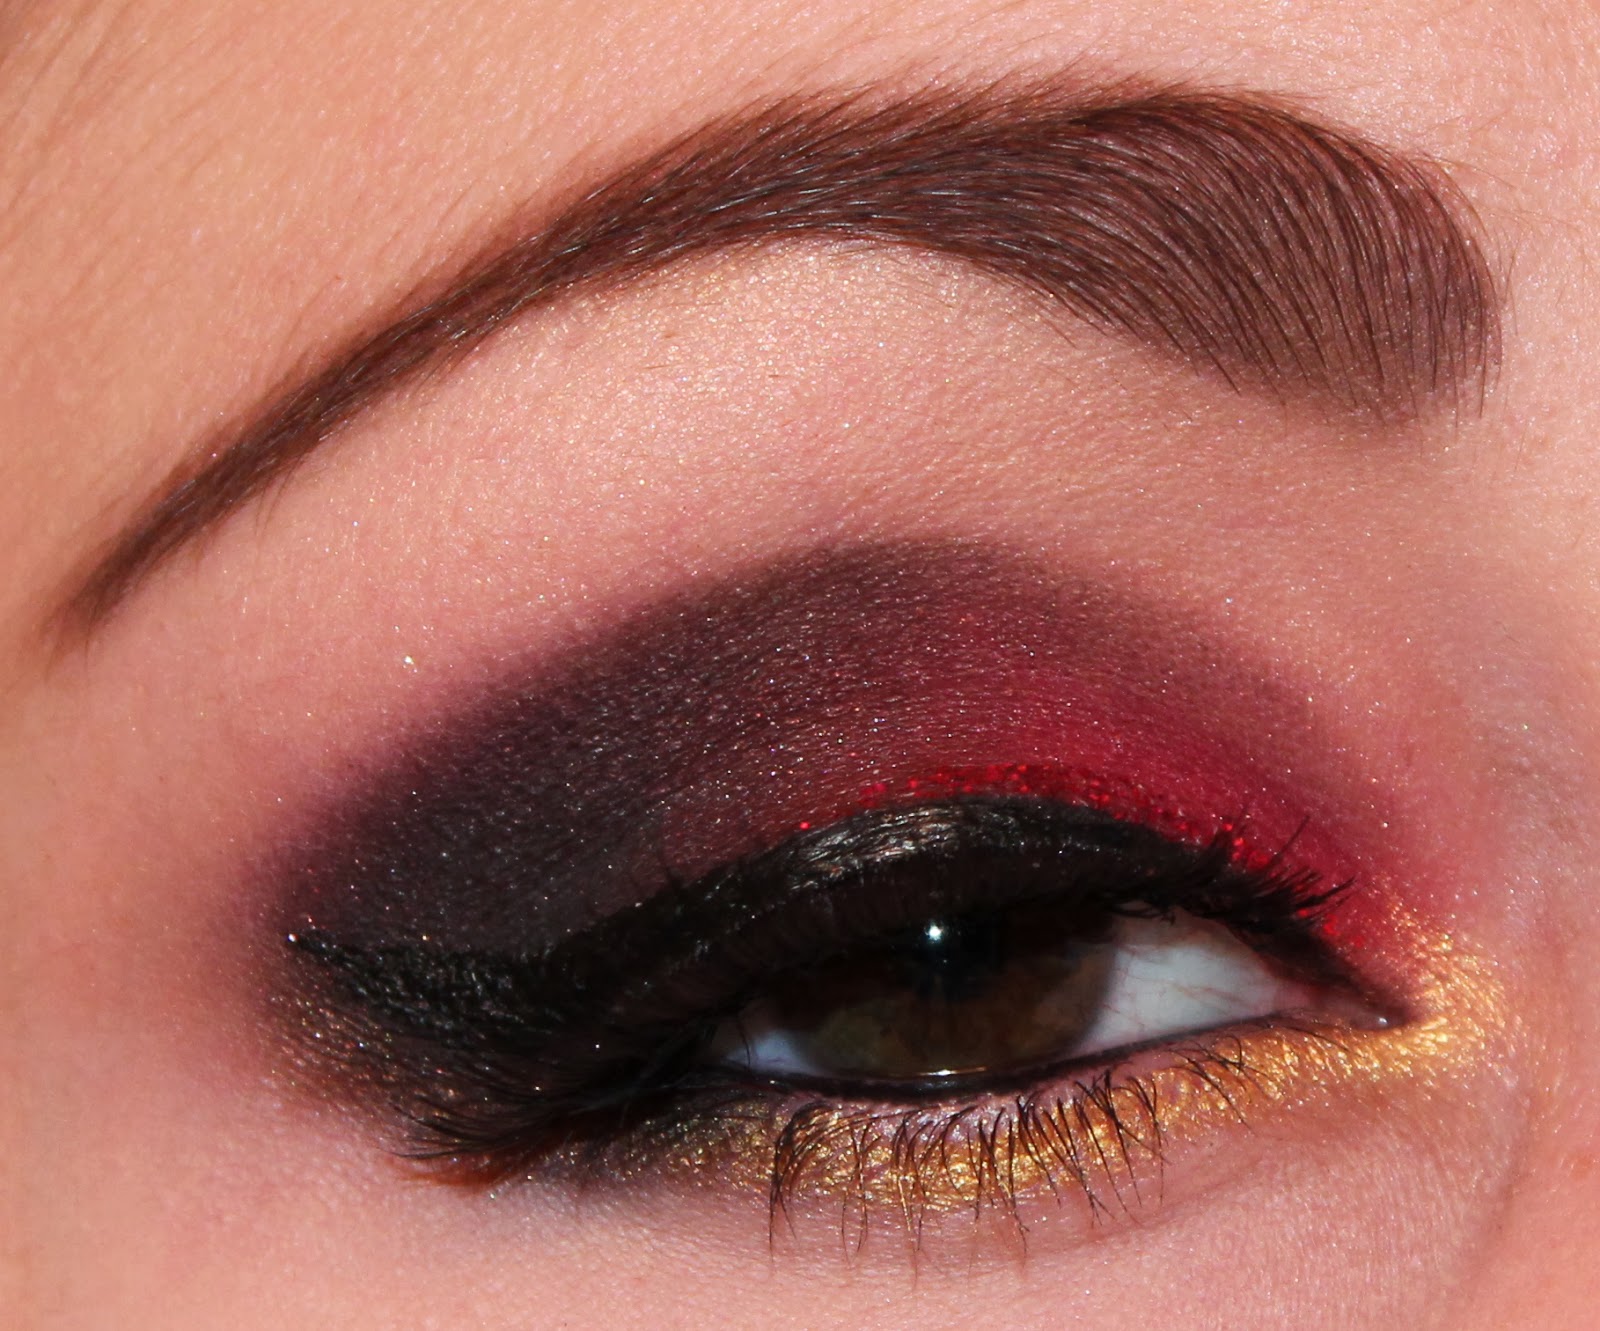
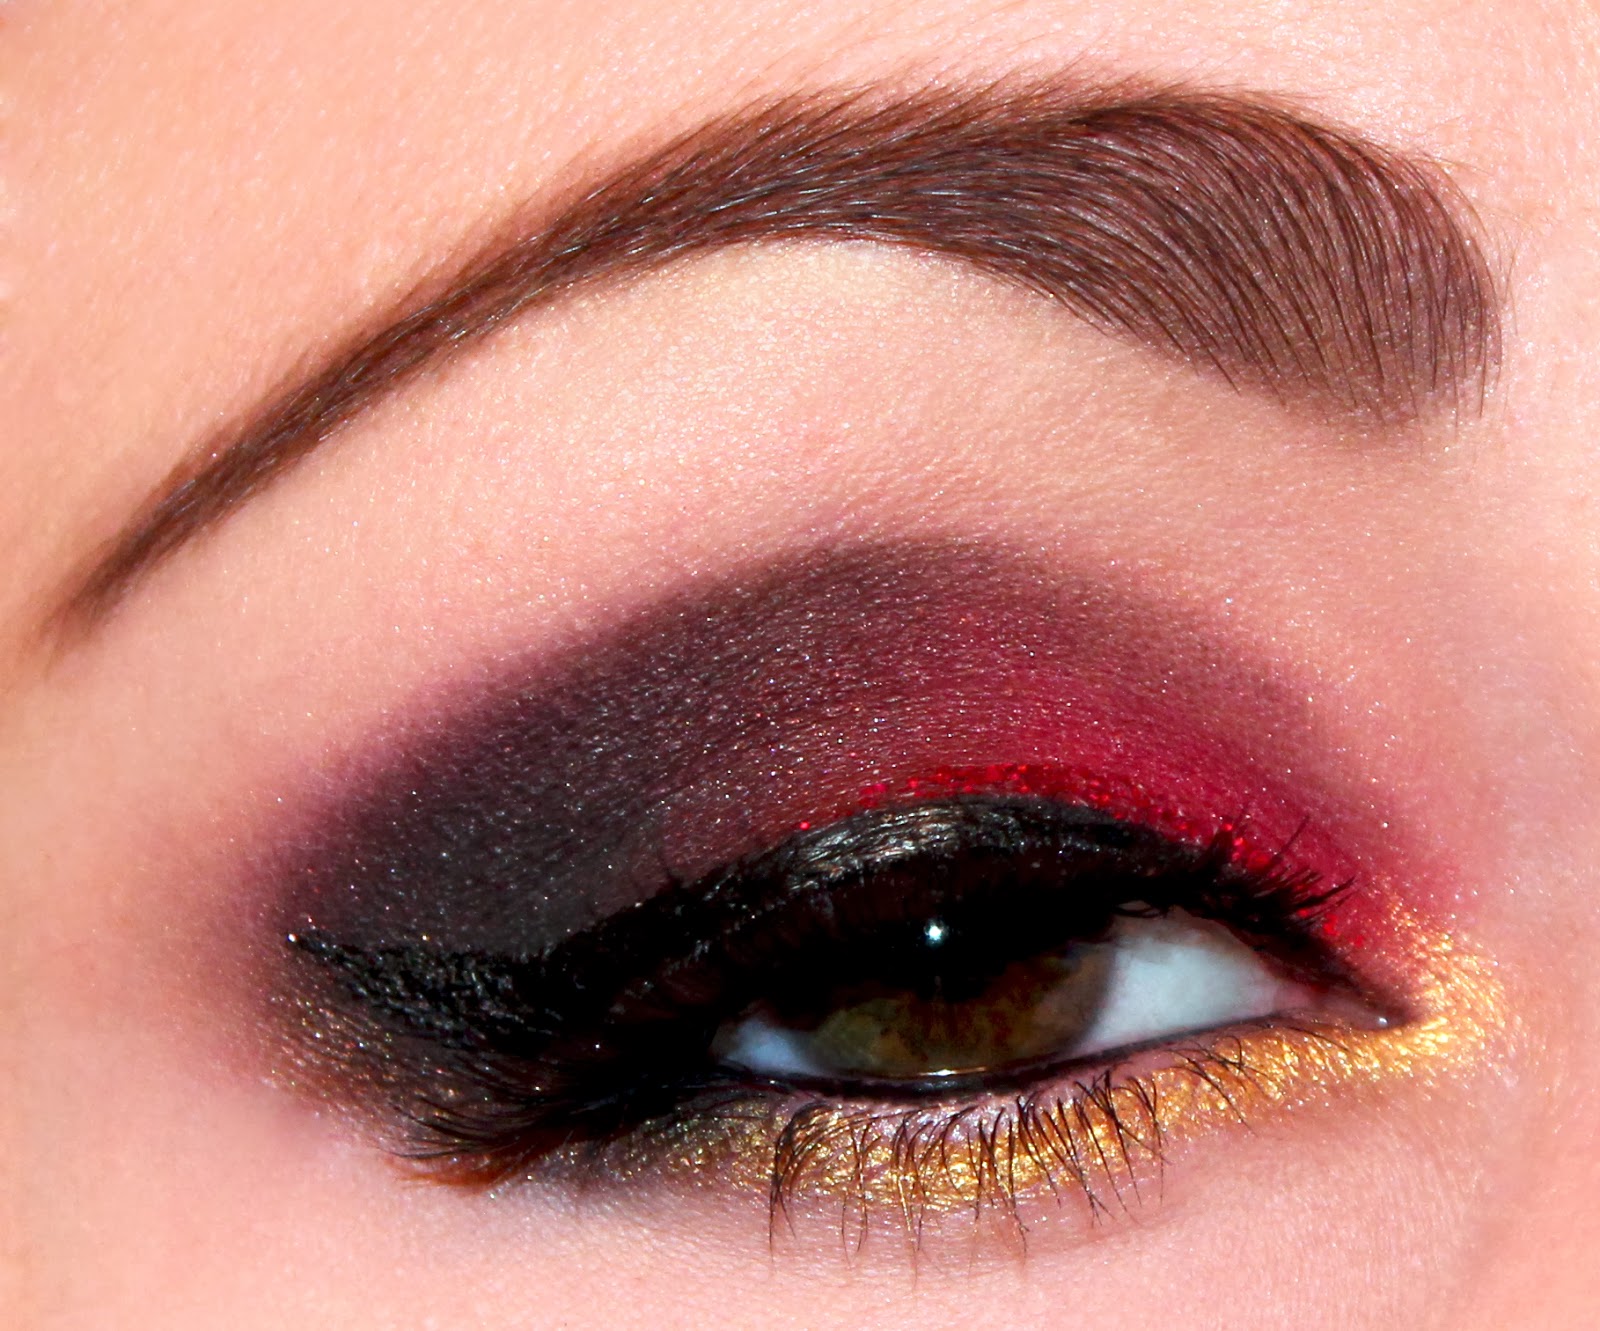
This is the raw picture, cropped. It's not horrible, but it could use some polishing. Notice that the only thing in the picture is my eye and brow so not to distract from the focus of the picture. (not showing the uncropped picture because you can basically see up my nose and I'm so not sharing that!).

2) Fixing the lighting and coloring of the picture
I use a few of Photoshop's features for this. First I use the Auto Tone option. Then, I always fade that to about 50% because the toning is a little harsh with the kind of lighting that I'm using to shoot my pictures. Then, I use the Auto Contrast option. This is the result.

Next I use the Exposure feature and crank up the exposure of the picture a little. I also increase the gamma slightly and then I increase the offset a tiny bit so not to lose the intensity of my liner and lashes. Bascially I'm brightening the overall picture, but keeping the darker colors intense so that I get a good contrast.

As you can see, the difference so far is slight, but it's nicer to look at already. Lastly for the coloring, I use the Vibrance option and crank it up a little bit. I also increase the saturation slightly. This makes my colors pop more.

3) Erasing Imperfections
Now we're getting to the fun part (at least in my opinion), perfecting the skin, eyes and brows. First I like to remove the veins and lashes that are in my eyes using the Patch Tool (some of my lashes have a tendency to grow downwards which looks super ugly in photo).

We're looking much better already! Now it's time to tidy up those eyebrows! I use the same Patch Tool to remove any unwanted hairs. I tweeze my brows every time I do a makeup look like this. Howeverm since I use the flash to take pictures and since it's such a close shot, you can see every single little hair I missed and all the blonde ones. I feel like it looks untidy so I like to remove them.

Next, I give the whole picture a little once-over and still with the Patch Tool, I fix any other little imperfections that I might see. The difference is subtle in this one. Can you spot the differences with the last picture?

After that, I like to perfect my skin. I don't always do this, especially if my skin is looking relatively good that day, but lately I've been doing it, so I'll show you how. I use the Eyedropper Tool to select a shade of skin that is near my eye. Then, with the Brush Tool (Opacity : 25%, Flow : 25%) I simply go over my skin once all around the eye to soften the look of the skin. It retains part of the texture of the skin because of the opacity, but it still covers up and evens out the skin a little.

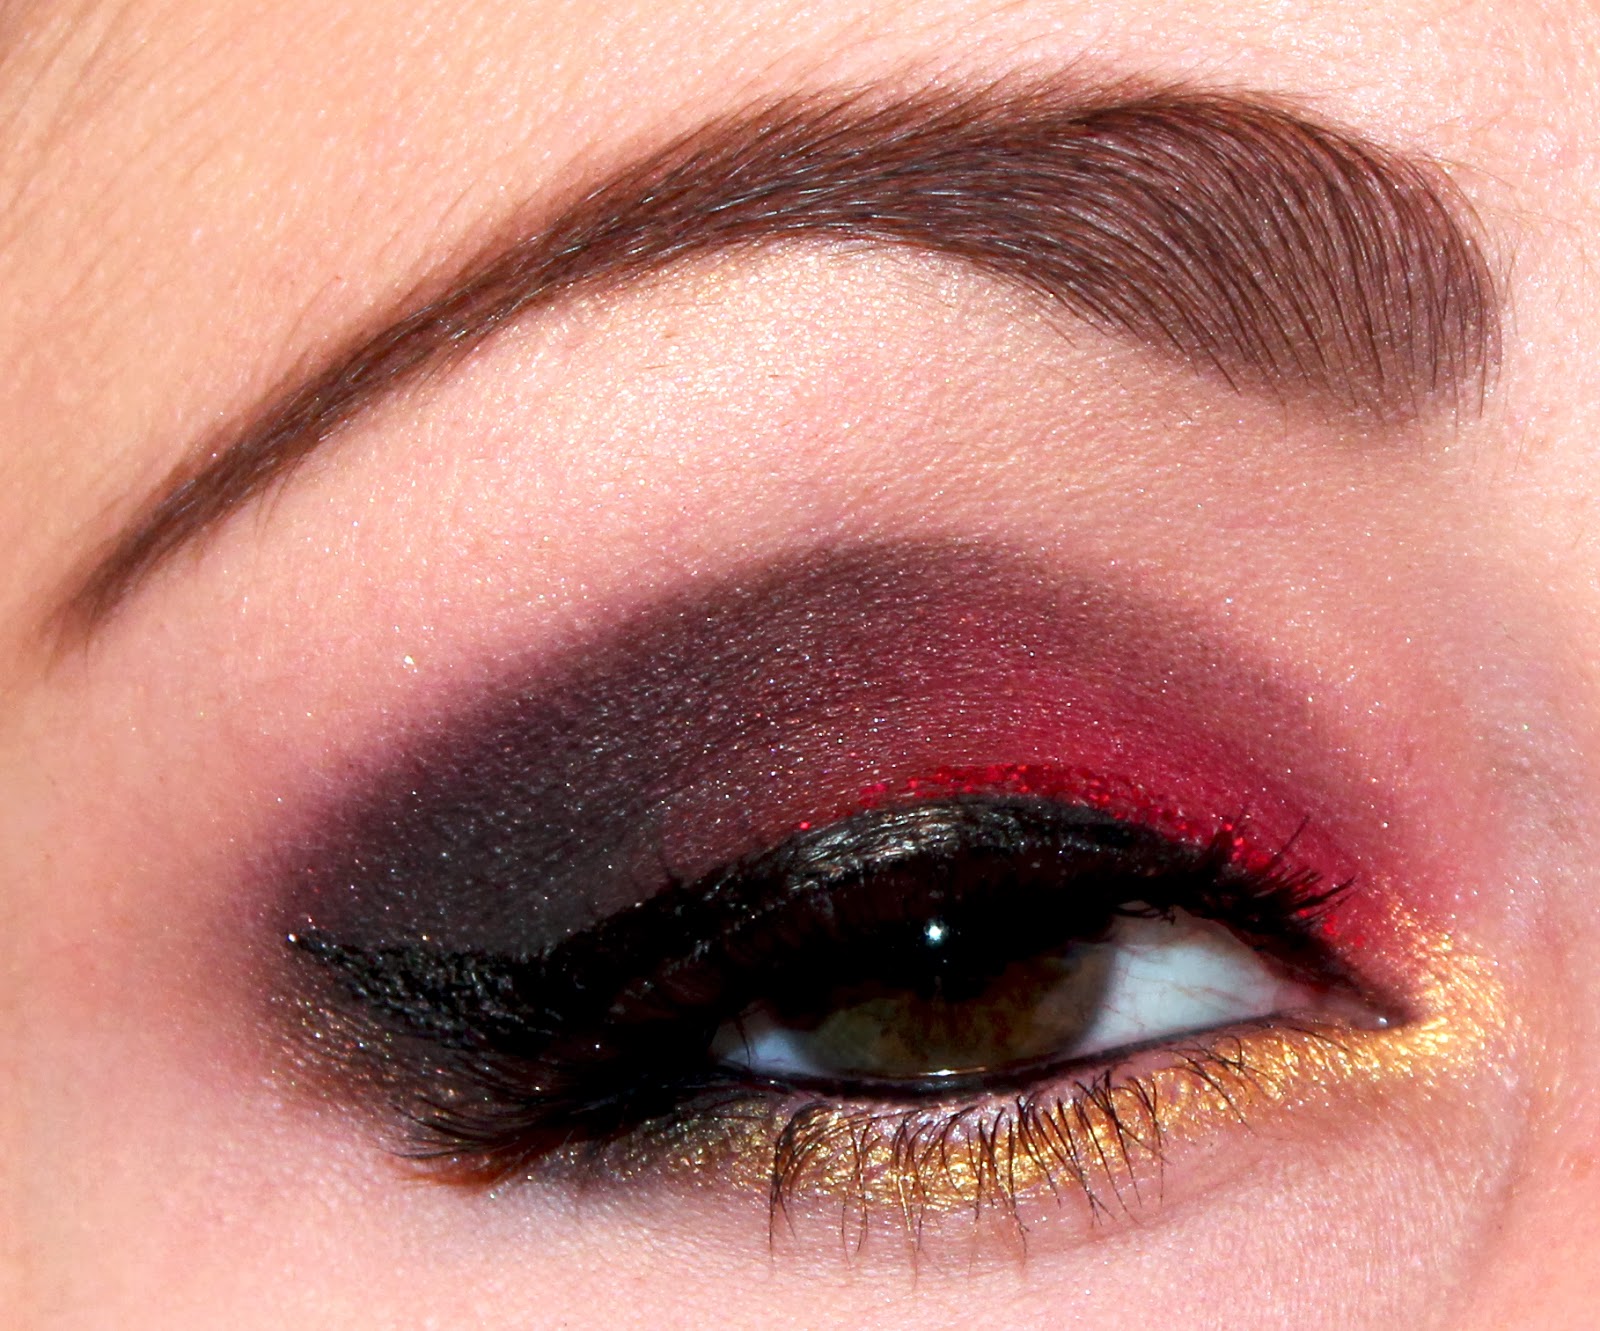
Last, you can brighten up your eye color using the Dodge Tool (Exposure : 40%). This is totally optional, but I like to do it every once in a while!

---

That's it! That's all I do to edit my makeup pictures! As you can see I haven't touched the makeup itself, but it still looks 100 times better! Hope you enjoyed this and that it was helpful! Does any of you guys edit your photos? If so, do you have any other tips and tricks for me? Let me know!

Don't forget to follow me and like my Facebook page for more posts like this ♥

LinkWithin

Related Posts Plugin for WordPress, Blogger...